How To Reduce Image Size In Paint

Your Quick Answer:

To decrease the size of an image using Paint, you have to open the app, go to the blue icon at the top, click on Open, and select a file. Click on Open under this, and click on Resize under Home.

Click on Pixels and change the size under Horizontal and Vertical. Then deselect the option that maintains the aspect ratio. Click on OK, and the image will be resized.

You can use an Online Image Compressor by Optimizilla by opening the website and tapping on UPLOAD FILES. You have to select a file, wait for it to be compressed, and then click on the DOWNLOAD option.

You can use Compress JPEG to resize images. All you have to do is open the website and click on UPLOAD FILES, then choose a JPEG file from your device and wait for it to be uploaded and compressed.

When the download option appears, click on it, and the compressed version of the photo will be downloaded to your device.

There are some steps to reduce PDF file size online.

How To Reduce Image Size In Paint:

Follow the steps below:

Step 1: Open Paint and Go to the Blue icon

The first step you have to follow is to go to the Windows icon at the bottom of the screen and search for MS Paint. Once you have found it, left-click on it to open it. You will now be on the main page of Paint, and there will be a blank page that you can paint on using the colors and brush stroke options available at the top of the screen.

Click on File

At the top left corner of the screen, you will find an option in blue with a drop-down arrow beside it. You will find this option beside the “Home” option. 

Step 2: Go to Open > Select a File

Once in the blue icon section, you will see options like “Save”, “Print”, etc. Click on the option that says “Open”. This will allow you to open the required file, which is an image.

The “Open” floating notification will open, and you can choose the file here by clicking on various folders. You can also type the file’s name in the search bar at the top right corner of the screen if you do not remember the file’s location. 
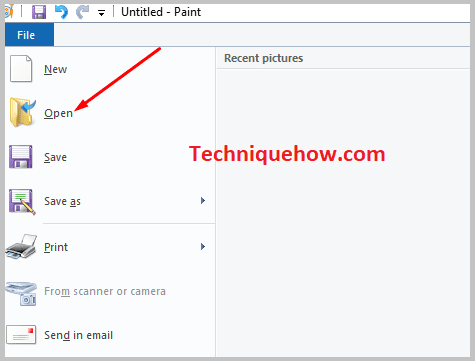
click to open

Step 3: Now Open the File

Now that you have found the image file you wish to resize, you must click on it. Then you will notice an option at the bottom of the screen that says “Open”. You have to tap on it.

The image you selected will appear in the part of the screen that appeared blank and unused in the beginning. To see the current size of the image, you’ll have to look toward the bottom of the screen, where it will be directly mentioned. 
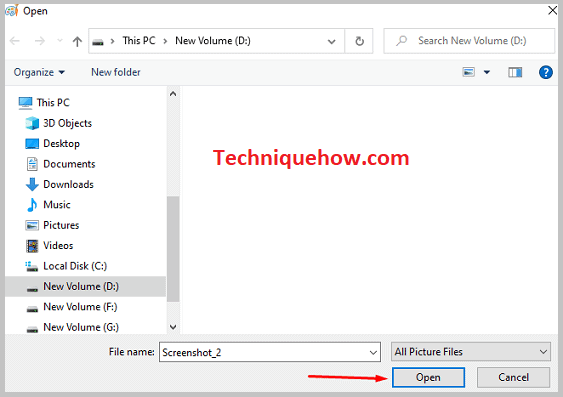
click open

Step 4: Resize the Image

At the top of the screen, you will see that you are in the “Home” section from the available sections mentioned. You have to click on the option there that says “Resize”. This will open the “Resize and Skew” section of Paint.

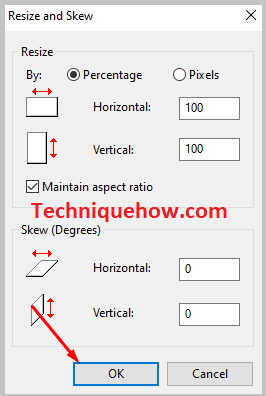
Click to resize
click ok

Click on “Pixels” and set a required size number under “Horizontal” and “Vertical” that you want to resize the image to. You will see, below this, that the “Maintain aspect ratio” option will be selected. You have to deselect this. Once you have done all the abovementioned things, click on the option at the bottom that says “OK”. The image will be resized and ready to be saved.

click on save

How To Reduce Image Size In Paint:

There are some other alternative ways to reduce the image size:

1. Online Image Compressor

Follow the steps below:

🔴 Steps To Follow:

Step 1: You can open this Online Image Compressor, also known as “Optimizilla”, by looking it up on Google and opening related results or by just clicking on the link mentioned above. 

Google and opening related results

Step 2: You will see an “UPLOAD FILES” option, this is where you have to click on it. A set of options will appear at the bottom of your screen or elsewhere, depending on your device, asking you to take a photo or choose one from your device files.

You will see an UPLOAD FILES

Step 3: Supposing that you want to upload a file, click on “Files” or the related option. Here, you have to look for the photo you want to resize. Once you have found it, you just have to select it.

You will now be taken back to the website’s main page but will see a miniature of the photo you uploaded under the “UPLOAD FILES” section. 

Step 4: Let the image you selected be uploaded and then compressed, this might take a second, which is why it would require your patience. Then click on the “DOWNLOAD ” option and select a location to save the file. The resized image will be in your gallery.

Then click on the DOWNLOAD

2. Compress JPEG Image

Follow the steps below:

🔴 Steps To Follow:

Step 1: Open “Compress JPEG” either by searching for it on Google and clicking on the required search results or by clicking on the link above. You will be on the JPEG conversion home page, where you will upload a photo that will be compressed.

Compress JPEG either by searching for it on Google

Step 2: A little lower on the screen, there will be a blue option that says “UPLOAD FILES” you have to click on it. In the next prompt, you will be asked to either take a photo you want to resize or choose the same from the image files available on the device. 

, there will be a blue option that says UPLOAD FILES

Step 3: Select an Image from your device files or take one, and a miniature of the same image will appear on the screen in the upload section showing the word “UPLOADING”.

As soon as the file is uploaded, the word will change to “COMPRESSING”. During this duration, you are requested to wait patiently until the file is ready for you in a compressed form to download.

Step 4: A “DOWNLOAD” option will appear in place of “COMPRESSING”. This is where you have to click to be able to download the compressed version of the file you uploaded either by choosing from files or taking one using the phone camera. 

A DOWNLOAD option will appear in the place of

Note: Make sure that your uploaded file is in JPEG format. Otherwise, the file will not be uploaded.

Also Read:

Leave a Comment