✎ Key Points:
» To save edited photos from Instagram without posting, use a story filter and save the photo.
» For that, first of all, open the Instagram app and slightly pull the screen to the right, to open the Instagram camera tap on the big white circle in the middle and click the picture.
Contents
How to Save Edited Photos from Instagram without Posting:
Saving edited photos from Instagram without posting them, is not a big deal. It is all rubbish that you cannot save without posting it.
Follow the steps below, to save the edited photos without posting them on Instagram:
Step 1: Open Instagram & take the photo
To start with, open the Instagram app on your mobile device and put in your username and password to log in. After logging in, be on the home page of your account.
Look at the options on the top right corner of the home screen. There you will see an icon with the “plus (+)” symbol in it. That icon is the option to post photos and videos on Instagram.

To edit a photo, you need to take a photo. So, hereafter hitting this + icon, you will get two options, one to click a picture using an Instagram camera and the second to choose a photo from the gallery. Do as per your requirement.

So, tap on the “plus +” icon on the top right corner of the screen and select > ‘Post’. After that, if you want to click pictures, tap on the ‘Camera icon’, given on the right side, just below the photo.
Whereas, if you wish to choose from the gallery, then, tap & swipe up below the photo and choose the photo you want to edit. Simply tap on the image you want to edit and it will appear on the screen.
Step 2: Choose any FILTER & tap on the blue arrow [→]
After capturing or choosing the photo from the gallery, tap on the blue ‘Arrow →’ on the top right corner of the screen. With this, you will land on the ‘Filter & Edit’ tab. You will see the selected photo in the upper section and below it, the various filters.
Swipe left to see more filters. Tap on the one you liked and want to add to your photo. On the bottom, to the right, you get an option of ‘Edit’.
If you wish to edit your photos, such as adjusting the brightness or contour, then click on it and do the editing.
Once done with adding a filter and editing the photo, click on the blue “Arrow →” on the top right corner of the screen to go to the next step.
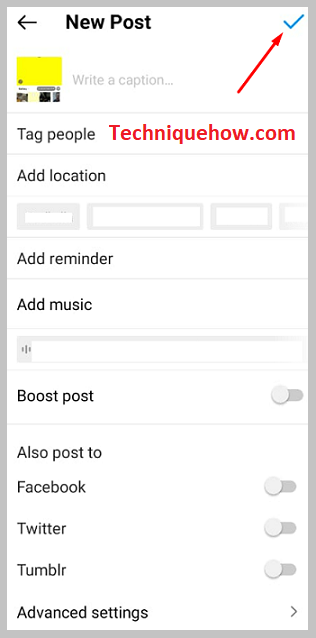
Step 3: Add > Location & type > Caption
Now, you will be on the ‘New Post’ tab, where you to write a caption and add a location. This is just to complete the posting process, that’s it. You are free to write a random caption and add a location.

Click on the space where it is written, > ‘Write a caption…’ in front of the photo and type a caption. After that, below the photo, tap on ‘Add location’ and select the location you want to add.
From here, be careful about the steps.
Step 4: Enable Airplane Mode & Turn Off WiFi
After writing a caption and adding the location, next what you do is, shut OFF the internet. Posting is not possible without the internet; hence, you need to switch it OFF.
For this, swipe down the screen to bring up the quick settings box, and from there, turn ON the ‘Airplane’ mode and turn OFF the WiFi. Your device should not be connected to any kind of internet network.

Once done with this, swipe up the quick settings box and come back to the Instagram ‘New Post’ tab.
Step 5: Tap on ‘ 🗸 ‘ and it will be pending
Next, what you have to do after switching OFF the internet, is tap on the tick mark icon > “🗸”, on the top right of the screen. And with this, your photo will go for posting.
But unfortunately – fortunately, it would be pending due to the internet network. You will see a notification stating, “Will auto-post when possible”. This means the photo is ready to post and is waiting on the internet.
However, in the next step, will discard (Delete) the post. So, even after switching ON the internet, the photo won’t get posted.
Step 6: Find that Draft and ‘Discard’
When you will click on the tick icon to post, you will fall back on the home page of your account, where you will be getting a notification saying > ‘Will auto-post when possible’. Look towards the extreme right corner, in front of this notification, you will find, ‘Three dots.’ Click on those ‘Three dots’ and select > “Discard”. Once again, click on “Discard” to confirm the deletion of that post.


Now, even though having an internet network, the photo would not get posted on Instagram.
Step 7: Open Photo Gallery & find that edited photo
After you discard it, close the Instagram app and open your phone’s gallery. In the photo gallery, find the edited photo under the Instagram folder.
Find that edited photo and then you can peacefully, turn OFF the airplane mode and switch ON your internet.
And that’s all to edit and save photos.
How To Save Edited Photos On Instagram:
Instagram story filters are as amazing as Snapchat. Instagram offers a wide range of aesthetic, funny, and colorful filters to add to the photos you click using its camera option.
1. lightshot Method
Just you can use this third-party tool called Lightshot to capture and save your edited Instagram photos.
🔴 Steps To Use:
Follow the steps below:
Step 1: First, open your preferred web browser and go to Lightshot at: https://www.lightshot.com/.
Step 2: Then, install the Lightshot extension/add-on for your browser.
Step 3: Next, go to Instagram and open the photo you have edited.
Step 4: Now, use Lightshot to capture a screenshot of the photo and save it to your device.
2. Photo Downloading Website
You can try using a photo-downloading website like DownloadGram to save your edited Instagram photos. Here’s how:
Step 1: First, open your preferred web browser and open DownloadGram: https://downloadgram.com/.
Step 2: After that, open Instagram and find the edited photo you want to save.
Step 3: Next, copy the URL of the photo by tapping on the three dots above the post and selecting “Copy Link.”
Step 4: Finally, go back to DownloadGram and paste the copied URL in the provided field. Then, click on the “Download” button to save the edited photo to your device.
3. Choosing a Filter
And the most wonderful thing is, it is not at all necessary to post edited photos to save them. You can click a picture on Instagram, add filters to them and easily save it to your gallery.
Step 1: Open the Instagram App
First of all, open the Instagram app on your mobile phone and log in to your account if you haven’t done it yet. After logging in to your account, stay on the ‘home’ page.
Step 2: Pull the screen to the right
Next, on the home page, you have to slightly pull the screen to the right, to open the Instagram camera. When you will pull the screen, the camera will get open.

Step 3: Click the picture
After the camera gets opened, click the picture. Focus the camera onto the object you want to capture and then, tap on the big white circle in the middle of the camera screen. With this, your photo will get captured and ready to add filters.

Step 4: Select the filter
Now, after capturing the picture, click on the ‘Three-star’ icon on the top of the captured photo screen. Tap on it and filters will appear on the bottom portion of the same screen. Slide to the left and you will get a variety of filters. Tap on the filter you like and wish to add to the photo. Simply, tap on the filter and it will get added to it.

Step 5: Hit the “Done” button
Once you are done with adding the filter to the photo, hit the ‘Done’ button, given on the top right corner of the filter option screen.

Step 6: Tap on ‘Three dots’ and select ‘Save’
Now, to save, click on the ‘Three dots’ in the top right corner of the screen. From the appeared options, select > “Save” and the photo will get saved to your device’s gallery.
Close the Instagram app and head towards your gallery. Under the ‘Instagram’ folder, you will find this photo.
In this way, you can use the Instagram story filter and save the photo without posting it.
