✎ Key Takes:
» You can change your Apple ID country by going to “Country/Region” and selecting “Change Country or Region” on your Apple device.
» You can use caution when adding payment details and a billing address during the process, although it’s optional not to include payment information.
Contents
How To Change Country On Apple ID:
Follow the below steps to change country on Apple ID:
Step 1: Open Settings & Account Name
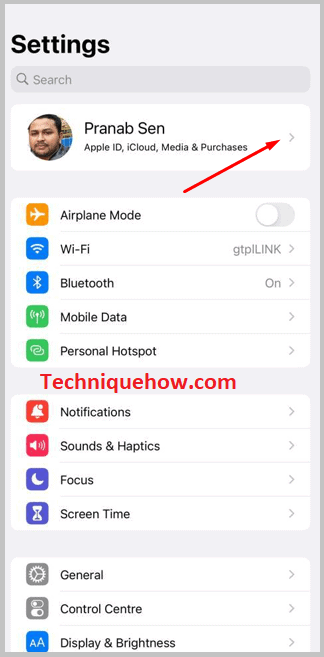
The first step you have to follow to change your Apple ID Country is to go to your phone’s home screen and go to the “Settings” app. In this settings area, you will see a list of options you can use to change your settings.

However, at the top of the screen, you will find an option with your Apple account name. You have to click on this option. In this section, you will be able to access all the information related to your Apple account and make consecutive changes.
Step 2: Go to Media & Purchases & View Account
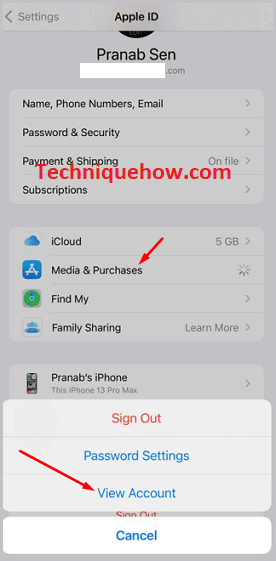
Now that you are in the Apple account section, you will see two lists of options. In the bottom set of options is one with the title “Media & Purchases”. You have to click on it. As soon as you do so, you will receive a pop-up notification at the bottom of the screen that will have a new set of options like “Sign Out”.
Here, you have to click on the third option from the list that says “View Account”. A tab called “Account Settings” will open as a result.

Step 3: Change Country or Region
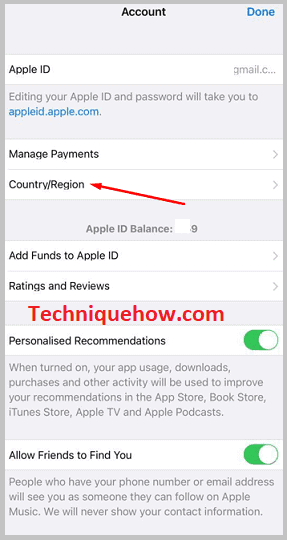
Now that you have tapped on “View Account” and reached the “Account Settings” area, you will find under it a list of options related to payment methods and location, such as “Manage Payments”. You’ll also be able to see your Apple ID here.

Now, you have to click on the option that says “Country/Region” with an arrow beside it. The “Country/Region” tab will open with an option in blue that says “Change Country or Region”. This option will do exactly as it says, help you change your country.
Step 4: Select a Country and Agree
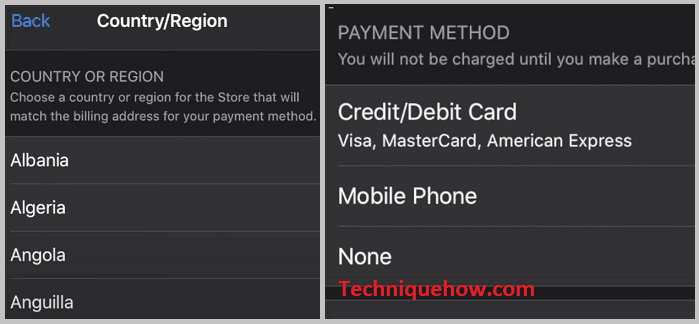
When you tap on the “Change Country or Region” option, you will be taken to a new tab that will have a list of names of all the countries. Scroll down until you find the country name you are looking for and select it.
You will then view a page with terms and conditions related to that particular country. Go through them and tap on “Agree”. You will receive a floating notification prompt now, asking if you have read the terms and conditions, and you have to tap on “Agree” again.
In the next section, you must type in your billing address and a credit card or debit card details. Then tap on “Next” and then on “Done”. You will have changed your country.

Why Can’t You Change Country on Apple ID:
There are some reasons why you would not be able to change the country:
1. Pre-orders on Apple TV & iTunes
A significant reason for your inability to change the country on Apple ID is if you have any active pre-orders on your Apple TV or iTunes. This is because different countries have different materials available for pre-order; this means that pre-orders are region-specific and, as a result, currency-specific, meaning they might be available in only a few currencies.
The price also varies across currencies. You might find the pre-order price cheaper in a particular currency compared to another. A change at this point would cause a lot of confusion which is why the option is not available to be used successfully for this duration. Therefore, changes in the region or country can only be made if the pre-order is canceled or completed.
2. You Have an Active Subscription
One of the common reasons why you face trouble while changing your country on Apple ID is if you have an active subscription. This is because different apps are available in different regions, and the content you see on the apps is also with respect to the region you are in.
The apps that are government-based or apps that are banned by some countries are examples of apps that are not found all over the world even though you are using the same App Store or Play Store.
In the case of subscriptions to said apps, you will have to wait until you have expired the subscription to be able to change the country.
3. You have Family Sharing Account
You will notice that if you are using a Family Sharing account, you will not be able to change your country or region. This is because all the people added to the Family Sharing account will share common credit card or debit card details, all of which are region-specific and provided to all members via the owner of the Family Sharing account.
Therefore, the only individual with the authority to change the country or region is the owner of this family-sharing account. However, you can change your region or country as soon as you stop using the Family Sharing account.
4. You Have Apple ID Balance
Often you might add money to your Apple ID and not use it till no money is left; this makes it impossible to change your region. You must not have any balance remaining on your Apple ID. If you have so much as less than one dollar, you still have to use this balance in its entirety before you can change your region.
The reason for this is that the currency for every country is different, and the currency you are currently using is not transferable to the currency your account will use after you change your region.
