
How To Create Apple ID Without Phone Number
When you try to set up an Apple ID and the device keeps asking for a phone number, especially when you just want to download apps or access iCloud without adding more personal details. Apple makes this step mandatory, yet you actually have workable ways to bypass the phone number field without breaking any rules. Some people want privacy, some want an account for a child, and some want an extra Apple ID for testing or work, so the need to register without a phone number becomes even more important.
You can create an Apple ID with only an email address in certain situations because Apple allows registration through alternative verification methods. This means you can still open an account if you follow the steps that guide the system to skip the mobile number requirement. You can try choosing the “Create Apple ID” option from places where Apple does not force SMS validation. Apple’s web-based setup behaves slightly differently from the iPhone setup screen.
You must want to maintain separation between your real number and your digital life, or when you just do not prefer adding unnecessary details. In several cases, Apple only asks for a phone number for account recovery, so an email-only approach still works because the recovery method depends on email verification alone.
This allows you to keep control over your privacy without losing access to Apple services. Some people use this method for quick testing of accounts, secondary IDs, or accounts for kids who do not own phones.
How To Create Apple ID Without Phone Number?
It’s very simple to avoid phone number verification when you follow a setup that depends fully on email verification. This creates a smoother path because Apple’s system accepts identity checks through email if the user selects a screen that does not force SMS. Some people complete the entire process without entering any mobile details.
1. Use Email Instead
You can try the email-only setup because Apple accepts verification codes through your inbox in several cases. This offers an easy way to skip the mobile field as long as you follow the correct registration process.
Step 1: First, sign in to your iPhone
Another way to create your Apple ID without using your phone number is to make it with an email address instead. You need to start by signing into your iPhone. You need to enter your current Apple ID and passcode correctly to sign into your iPhone. If any of these credentials are entered incorrectly, you won’t be able to go to the next step.
Step 2: Create an Apple ID
Then you need to start creating your Apple ID. You need to click on the Create Apple ID button that you’ll find on the screen to proceed with creating your new Apple ID. It will take you to the next page where you’ll be shown a form. This is the Apple ID creation form that needs to be filled up by you.
Step 3: Enter Name, DOB, etc
Fill up the Apple ID form. Make sure that the information you’re providing over here in this form is nothing but correct because all of this will be verified and checked before your new ID gets created. You need to start by entering your name in the form and then entering your date of birth. Go on and fill up the rest of the form. Double-check all the information that you’re entering.
Step 4: Enter a valid Email and set the Password
Then you need to enter a valid email address. The email address you are entering over here should belong to you, and you need to have access to it. While entering the email address, you need to make sure that you’re entering the spelling correctly. Next, you need to set a password for your Apple ID. It should be strong to secure your account
Step 5: Enter Virtual Phone & Verify
Next, you need to enter your virtual number as your phone number. The virtual number that you’ve bought from Exotel will help here. You need to enter the virtual number correctly, and then it needs to be verified to prove that the number belongs to you. They’ll send a code to your Exotel account, which you need to enter on the verification page for confirmation of your number.
Step 6: Agree on T&C and Add Passcode
Lastly, you need to agree to the terms and conditions of Apple to sign up for your Apple ID. Keep aside some time to read the terms and conditions, as you should always agree to them only after reading them.
Next, you’ll be asked to enter your Apple passcode, and your process will be completed.
2. Use Phone Number of a Friend or a Family Member
If you don’t have access to your own phone number, using a trusted person’s number can be a quick solution.
This number will be used temporarily to receive the verification code needed to set up the Apple ID. You can change the number later once the account is active. Make sure the person knows they’ll receive a text with a code during setup.
Step 1: Visit iCloud.com and click Create Apple ID.
Step 2: Fill in your name, email, password, country, and date of birth.
Step 3: Enter your friend’s phone number for verification.
Step 4: Ask them to share the code they received and enter it to complete setup.
📌 TIP
Once the account is created, go to Apple ID settings and update the number to your own or remove it entirely if not needed.
3. Use a Virtual Number – Exotel
If you want to make an Apple ID without using your actual phone number, you can get a virtual number for yourself and then use it to create your new Apple ID.
It offers a 7-day free trial plan. You need to buy an Exotel virtual number first and then use it for signing up for your Apple ID.
The Exotel virtual numbers don’t have any locational restrictions or boundaries. It lets you call and connect with people from anywhere across the globe. The cost of its service is minimal, too.
Step 1: First, you’ll need to sign in to your iPhone.
Step 2: After that, click on the Create Apple ID button and then enter your date of birth correctly.
Step 3: Then you need to click on the tag that says Don’t have an email address.
Step 4: Enter email@icloud. Then click on Create.
Step 5: Then you need to go to the Exotel website and get a virtual number for yourself. You’ll find the link to the website: https://exotel.com/products/voice/.
Step 6: After getting into the website, click on Try it for free.
Step 7: Fill up the trial form and then click on START MY FREE TRIAL.
Step 8: Then choose a virtual number that you want to use and buy it.
Step 9: Enter the virtual number on the Apple ID form and then verify it.
Lastly, enter your passcode and complete the process.
How to Create an Apple ID without an Email?
This is actually unusual to make an Apple ID without an email, yet some people attempt this when they only want a basic account for temporary usage. This becomes tricky because Apple requires at least one recovery channel.
Step 1: Tap on ‘Sign in to your iPhone’
To create an Apple ID without a phone number and email, you have to follow the first step to go to Settings from the phone’s home screen.
This will open the main menu of the Settings tab of your phone. At the top, the first option that you will find will be “Sign in to your iPhone,” and the subtext under it will read “Set up iCloud, the App Store, and more”.
Tap on this option. You will see a bright blue option, “Don’t have an Apple ID or forgot it?”

Below this will be a list of icons of Apple services that you will be able to access once you have an Apple ID.

Step 2: Tap ‘Create Apple ID’
When you see the blue text that reads “Don’t have an Apple ID or forgot it”, you must tap on it as mentioned above in Step 1.
A floating notification will appear on the screen with three options: “Create Apple ID?”, “Forgot Apple ID?” “Cancel”. For now, you have to tap on the “Create Apple ID” option, which will lead you to the “Name and Birthday” section, where you will have to type in your details.

Step 3: Enter Name, DOB, and Details
Once you’re in the “Name and Birthday” tab, you will be asked to type your first name, last name, and date of birth. Your date of birth or, more specifically, your age will determine what kind of apps and services you can use on the iPhone.
Type in all the details and then tap on the “Next” option at the top right corner of the screen. Once you tap on the “Next” option, you will be asked to type in your Email ID, but you do not have to type it in.
You will see the “Don’t have an email address?” option below the email text box in bright red color.

Step 4: Tap ‘Don’t have an email address’
In this step, you have to tap on the bright blue highlighted option, “Don’t have an email address?” This will open a floating notification on your phone with two options: “Get an iCloud Email Address” and “Cancel”.
You have to tap on the “Get an iCloud Email Address” option. This will lead you to the “Email Address” tab, and you have to create an iCloud Email address.

Step 5: Enter a value in Email@iCloud & Create
To create an iCloud Email address, type in whatever username you would like your email ID to be and put a few numbers in the email ID if the ID of your choice is not available.
When you are done, tap on the “Next” option at the top right corner of the screen. A prompt will appear at the bottom of the screen reminding you that once made, the iCloud email ID cannot be changed.
Below will be two options: “Create Email Address” and “Cancel”. You have to tap on the “Create Email Address” option.

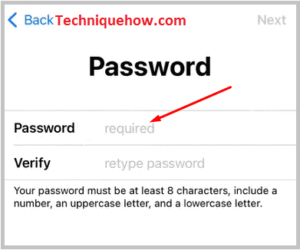
Step 6: Set Passwords
You will be led to the “Password” tab, where you must set a password. Please type in your password and then retype the same password to verify it. Please make sure to remember this password. You can even make a note in a personal journal if you feel that you might forget it. Tap on next after you’re done.
Note: There are a few rules to keep in mind while setting the iCloud email password – it should be at least 8 characters long, and it should include a number, an uppercase letter, and a lowercase letter.
This complicated password will ensure that no one can easily find your password.

Step 7: Enter Phone Number & Verify
You will have been led to the” Phone Number” tab. Here, you will have to enter the area code, country, and phone number. Below this, there will be two options in which the verification can take place.
One option is via “Text Message” and the other via “Phone call”. Choose the option most suited to you.

For example, you tapped on” Text Message” verification. After typing in your area code and phone number, tap on “Next”. You will be asked to type in a verification code. Below it, there will be an option “Didn’t get a verification code?”.

Tap on it, and a floating notification will ask you if you would love a new code, verify via phone call, or verify later( or cancel). Tap on “Verify Late”. In the next window, tap on “Continue.”

Step 8: Agree on T&C and Add Passcode
Now you will be in the “Terms and Conditions” window. Read through this area and tap on “Agree”. Again, a floating window will appear asking if you agree to the conditions. Tap on “Agree”. Now you will be signed in to your iCloud.

You will be taken to the “Enter iPhone Passcode” window, where you will have to type a four-digit code that will be used to protect all the sensitive data and passwords that you will have on the phone. Set a passcode of your choice.
Frequently Asked Questions:
Apple asks for recovery information because the company must ensure users can regain access if they forget passwords or lose devices. This protects personal data stored in iCloud, including photos, documents, and backups. Recovery details help prevent unauthorized access and reduce account lockouts caused by incorrect login attempts. Apple’s security design depends heavily on identity confirmation, so extra verification options strengthen overall protection.
Apple uses verification codes to confirm that the person signing in truly owns the account, especially when accessing it on a new device or browser. This prevents attackers from logging in even if they know the password. Apple’s two-factor system generates unique codes that expire quickly, reducing the chances of unauthorized use. The process also alerts the user when unusual login activity occurs.
An Apple ID is required because the App Store must track purchases, manage licenses, and store user preferences across devices. This allows apps, subscriptions, and in-app purchases to synchronize correctly. Apple also uses the account to enforce age restrictions, monitor billing information, and maintain device-to-device continuity. Without an Apple ID, the system cannot save app ownership or restore downloads after upgrades.
Apple requests identity confirmation because altering details like email, password, or payment method affects the entire account and linked devices. Confirming identity prevents unwanted changes caused by phishing, stolen passwords, or unauthorized device access. Apple uses this step to ensure that major updates are controlled only by the real owner.
