✎ Key Points:
» You can initiate a YouTube video premiere through your laptop by accessing the Create option at the top panel and selecting Upload videos.
» You can use the Select File option to choose the video file, provide a title, and navigate to the Visibility section.
Contents
- How To Set A Premiere On YouTube Mobile:
- Step 1: Open YouTube on the browser
- Step 2: Click ‘Upload videos’ and Upload a Video File
- Step 3: Set a Title & Move to the ‘Visibility’ tab
- Step 4: Scroll and Click on ‘Schedule’
- Step 5: Choose a Date & time and click ‘Set as Premiere’
- Step 6: Click on the ‘SCHEDULE’ Button to Save
- Now close and it will be premiered at that timing
- 🔯 Can you Premiere a Video on Mobile?
How To Set A Premiere On YouTube Mobile:
Follow the steps below:
Step 1: Open YouTube on the browser
If you’re looking to know how to premiere a YouTube video, you’ll need to open the YouTube site on the browser and not on the YouTube application. When you’re premiering a video on YouTube, it’s showing the pre-recorded video live on YouTube.
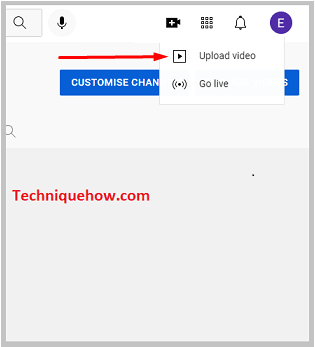
After you enter the interface of the YouTube site, on the top panel, you’ll find the option Create in red. You’ll need to head over to the top panel to click on the Create option.
YouTube premieres are one of the most interesting features of YouTube that let you play the live stream of your video on YouTube so that your audience can watch it in the form of a live video. As the premiere occurs with live chats, it enables you to interact with your audience and answer their questions during the premiere.

Step 2: Click ‘Upload videos’ and Upload a Video File
After you click on the Create option, you’ll be able to see two sub-options presented in a small box. Those are Upload videos and Go Live. These are the two ways to create content on YouTube. Therefore, you can either upload pre-recorded video or you can go live on the platform to interact with your audience.
For this method, you’ll need to click on the first option Upload videos and then it will open up a new white page on the screen. That’s the Upload videos page. On the page, you’ll be able to see the blue SELECT FILES option.
Click on the SELECT FILES option and you’ll be asked to choose a video file from your device’s storage. You’ll need to choose and select any of the videos that are available on your device that you want to upload and then click on the Choose option. This was the first part of the process which you’ve now successfully completed.
Step 3: Set a Title & Move to the ‘Visibility’ tab
After you choose the video that you want to upload, you’ll be taken to the next page, where they ask you to enter a title for the video you want to upload. Therefore, provide a well-constructed, meaningful, and related title to the video by jotting it down in the title box.
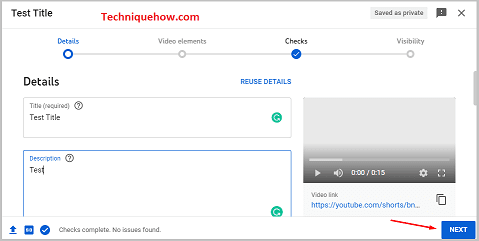
After you’re done with setting the title of the video, you’ll need to move to the Visibility section of the screen.
YouTube allows you to cast a live stream of any pre-recorded video as a premiere. It shows the video in your audience’s YouTube feed before it starts to premiere so that they can set the notification regarding the premiere of the video.
Step 4: Scroll and Click on ‘Schedule’
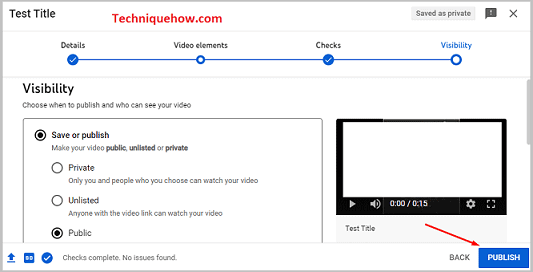
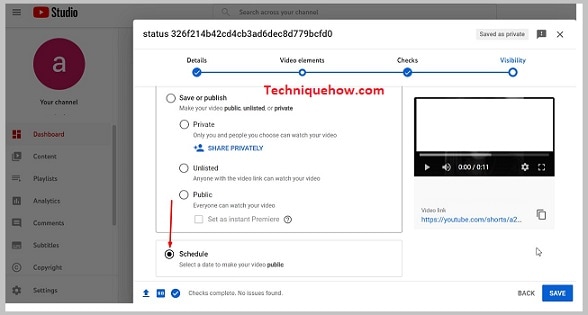
After you’re done entering the title for your video, you’ll need to get into the Visibility section of the video. From this section, you’ll need to set the timings and date of your YouTube premiere.
After getting into the Visibility section, scroll down the page and there you’ll be able to see an option Schedule. This is the option that will allow you to set a fixed time for your premiere. After you finalize the time, it will be informed to your audience and the countdown to the premiere will begin.
Besides other classic features of YouTube, it’s known for its premiere feature because it’s an effective and powerful tool to grow a YouTube channel and attract more and more audiences to it.
Step 5: Choose a Date & time and click ‘Set as Premiere’
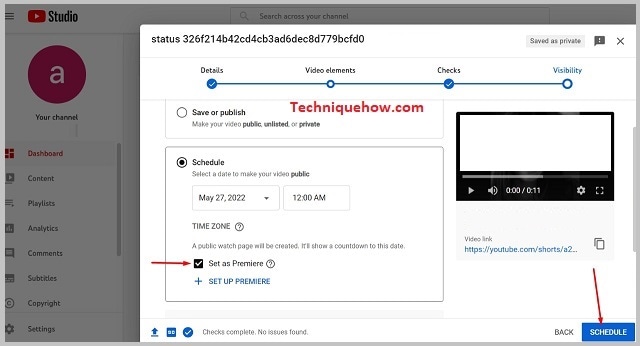
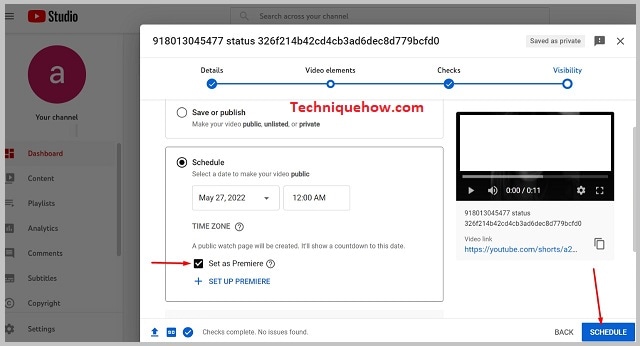
After you click on the Schedule option it will automatically open up the date and time selection section. You’ll first need to choose a particular date on which you want to premiere your video. Make sure the date that you choose is correct because it would be informed to your audience.
To choose the date, you’ll need to click on the downward triangle icon that’s inside the date box. From there you’ll need to select a date from the calendar. After selecting a date, you’ll need to click on the downward triangle that’s inside the time box and select a time when you want to premiere your video.
You can also see the time zone that’s used if required. Next, you’ll need to tick the box next to Set as Premiere to finalize and save the selected dates.
Step 6: Click on the ‘SCHEDULE’ Button to Save
After you’re done finalizing the time and date of the premiere of your video, you’ll need to recheck it once and then click on the blue Schedule box that’s at the bottom right of the screen.
After you click on the Schedule button, you’re done setting the premiere of your video.
To gain more audience during the premiere of your video, you’ll need to tell your subscribers to set the reminder button, hit the subscribe button on your Channel, and get the channel’s notifications by clicking on the bell icon next to the subscription button. The more you promote it, the more audience you can gain for the premiere. You can also chat with your viewers on the watch page before the premiere of your video and during the premiere too for knowing their feelings and opinions towards it.
Now close and it will be premiered at that timing
Clicking on the Schedule button will fix the date and time of the premiere. After clicking on it, you’ll be able to see the message box that says, Video scheduled on it. On the message box, you’ll also be able to see the date and time of the premiere.
Below that, you’ll be able to find some options and apps to which you’ll be able to share the link to the premiere. You can directly click on those apps to share the link of the premiere it by putting it on Facebook, Twitter, etc. This will help you promote your video more.
Under the Video link, you’ll be able to find the link to the premiere too. You can click on the Copy icon that’s next to the link to copy it on your clipboard so that you can paste it later to send it to others. After you’re done with all these steps, click on the Close button. Your video will premiere on the set date and time.
🔯 Can you Premiere a Video on Mobile?
You can use your mobile phone to Premiere a video on YouTube. However, you cannot use the YouTube application directly to Premiere it. You’ll need to go to the YouTube site from the Safari browser.
Therefore, whenever you want to set a premiere of a video on YouTube from your mobile, you’ll need to open the Safari browser and then search for YouTube on it. You’ll need to use the Desktop mode of the browser to perform the setting of the Premiere
After you open YouTube from there, you’ll need to follow the same steps as you do on a laptop to set the premiere of the video. You won’t be able to do it from the mobile version of the Safari browser.
You won’t be able to use the YouTube application to premiere a video on YouTube from mobile but you’ll need YouTube Studio to set the premiere of a video from there. The steps to set the premiere of the video from the desktop mode remain the same. Hence, you’ll need to click on Create, then click on the Upload videos option. Select a video and then schedule a date and time for it to premiere. Save the date and time and it’s done.
